ExoPlayer详解系列文章
一、ExoPlayer,你好
简单用例
入门ExoPlayer包括实现以下步骤:
- 将
ExoPlayer添加为项目的依赖项。- 创建一个
SimpleExoPlayer实例。- 将播放器连接到视图(用于视频输出和用户输入)。
- 准备 player 的
MediaSource播放。- 完成后释放播放器。
添加ExoPlayer作为依赖项
1、添加存储库
确保build.gradle项目根目录中的文件中包含Google和JCenter存储库。
    repositories {
	    google()
	    jcenter()
    }
2、添加ExoPlayer模块
接下来在app目录下的build.gradle的文件中添加依赖项。以下内容将为完整的ExoPlayer库添加依赖项:
implementation 'com.google.android.exoplayer:exoplayer:2.X.X'
2.X.X您的首选版本在哪里(可以通过查阅发行说明找到最新版本)。
作为完整库的替代方法,您只能依赖于实际需要的库模块。例如,以下内容将添加对Core,DASH和UI库模块的依赖关系,这对于播放DASH内容的应用程序可能是必需的:
    implementation 'com.google.android.exoplayer:exoplayer-core:2.X.X'
    implementation 'com.google.android.exoplayer:exoplayer-dash:2.X.X'
    implementation 'com.google.android.exoplayer:exoplayer-ui:2.X.X'
下面列出了可用的库模块。向完整的ExoPlayer库添加依赖项等同于单独添加所有库模块的依赖项。
exoplayer-core:核心功能(必需)。exoplayer-dash:支持DASH内容。exoplayer-hls:支持HLS内容。exoplayer-smoothstreaming:支持SmoothStreaming内容。exoplayer-ui:用于ExoPlayer的UI组件和资源。
除了库模块,ExoPlayer还有多个扩展模块,它们依赖于外部库来提供附加功能。浏览扩展目录及其各自的README以获取详细信息。
3、打开Java 8支持
如果尚未启用,则需要在所有 build.gradle文件中打开Java 8支持,具体取决于ExoPlayer,方法是在以下android部分添加以下内容:
    compileOptions {
      targetCompatibility JavaVersion.VERSION_1_8
    }
4、创建播放器
您可以使用 ExoPlayer创建实例 ExoPlayerFactory。这个工厂实例提供了一系列方法来创建 ExoPlayer具有不同级别自定义的实例。对于绝大多数用例, ExoPlayerFactory.newSimpleInstance应该使用其中一种方法。这些方法返回 SimpleExoPlayer,扩展 ExoPlayer为添加额外的高级播放器功能。下面的代码是创建一个的例子 SimpleExoPlayer。
SimpleExoPlayer player = ExoPlayerFactory.newSimpleInstance(context);
必须从单个应用程序线程访问ExoPlayer实例。对于绝大多数情况,这应该是应用程序的主线程。使用ExoPlayer的UI组件或IMA扩展时,需要使用应用程序的主线程。
必须访问 ExoPlayer 实例的线程可以通过 Looper在创建播放器时传递来明确指定。如果未 Looper指定,则 Looper使用创建播放器的线程,或者如果该线程没有 Looper, Looper则使用应用程序的主线程。在所有情况下, Looper可以使用查询必须访问播放器的线程 Player.getApplicationLooper。
5、将播放器附加到视图
ExoPlayer库提供了一个 PlayerView封装一个 PlayerControlView,一个 SubtitleView和一个 Surface视频的视图。一个 PlayerView可以包含在应用程序的布局 xml中。将播放器绑定到视图非常简单:
    // Bind the player to the view.
    playerView.setPlayer(player);
如果您需要精准控制播放器并在 Surface上渲染视频,可以设置 player的目标 SurfaceView, TextureView, SurfaceHolder或 Surface直接分别使用 SimpleExoPlayer的 setVideoSurfaceView, setVideoTextureView, setVideoSurfaceHolder和 setVideoSurface的方法。您还可以将其 PlayerControlView用作独立组件,或实现自己的播放控件,直接与播放器进行交互。 SimpleExoPlayer的 setTextOutput和 setId3Output方法可用于在回放期间接收字幕和ID3元数据。
6、准备播放器
在 ExoPlayer 中,每个媒体都由一个 MediaSource代表。要播放媒体文件,必须首先创建一个对应的 MediaSource,然后将此对象传递给 ExoPlayer.prepare。 ExoPlayer 库提供 MediaSourceDASH(DashMediaSource), SmoothStreaming(SsMediaSource),HLS(HlsMediaSource)和常规媒体文件 (ProgressiveMediaSource)的实现。以下代码显示如何准备 MediaSource适合播放MP4文件的播放器。
    // Produces DataSource instances through which media data is loaded.
    DataSource.Factory dataSourceFactory = new DefaultDataSourceFactory(context,
    Util.getUserAgent(context, "yourApplicationName"));
    // This is the MediaSource representing the media to be played.
    MediaSource videoSource = new ProgressiveMediaSource.Factory(dataSourceFactory)
    .createMediaSource(mp4VideoUri);
    // Prepare the player with the source.
    player.prepare(videoSource);
7、控制播放器
一旦准备好了播放器,就可以通过调用播放器上的方法来控制播放。例如: setPlayWhenReady开始和暂停播放,各种 seekTo方法在媒体内寻找, setRepeatMode控制媒体是否以及如何循环, setShuffleModeEnabled控制播放列表改组,以及 setPlaybackParameters调整播放速度和音高。
如果 player被绑定到 PlayerView或 PlayerControlView,则用户与这些组件的交互将导致调用播放器上的相应方法。
8、释放播放器
在不再需要 player时释放播放器非常重要,这样可以释放有限的资源,例如视频解码器,供其他应用程序使用。这可以通过调用来完成 ExoPlayer.release。
二、监听 Player 事件
状态更改和回放错误等事件将报告给已注册的 Player.EventListener实例。注册监听器以接收此类事件很容易:
    // Add a listener to receive events from the player.
    player.addListener(eventListener);
Player.EventListener具有空的默认方法,因此您只需要实现您感兴趣的方法。有关方法的完整描述以及何时调用它们,请参阅Javadoc。两个最重要的是 onPlayerStateChanged和 onPlayerError,下面将更详细地描述。
(一)、onPlayerStateChanged
player 状态的变化可以通过 onPlayerStateChanged(boolean playWhenReady, int playbackState)在注册中 实施来接收 Player.EventListener。播放器可以处于以下四种播放状态之一:
Player.STATE_IDLE:这是初始状态,播放器停止时的状态以及播放失败时的状态。Player.STATE_BUFFERING: player 无法立即从当前位置进行播放。这主要是因为需要加载更多数据。Player.STATE_READY: player 可以立即从当前位置进行播放。Player.STATE_ENDED:播放器播放完所有媒体。
除了这些状态之外, player 还有一个 playWhenReady标志来指示用户打算播放。如果状态为 Player.STATE_READY和 playWhenReady=true,则播放器仅播放。
	@Override
	public void onPlayerStateChanged(
	      boolean playWhenReady, @Player.State int playbackState) {
	  if (playWhenReady && playbackState == Player.STATE_READY) {
	    // Active playback.
	  } else if (playWhenReady) {
	    // Not playing because playback ended, the player is buffering, stopped or
	    // failed. Check playbackState and player.getPlaybackError for details.
	  } else {
	    // Paused by app.
	  }
	}
(二)、 onPlayerError
可以通过 onPlayerError(ExoPlaybackException error)在注册中 实现来接收导致回放失败的错误 Player.EventListener。发生故障时,将在播放状态转换为之前立即调用此方法 Player.STATE_IDLE。 ExoPlaybackException有一个 type字段,以及相应的 getter方法,它们返回原因异常,提供有关失败的更多信息。以下示例显示了如何检测由于HTTP网络问题导致播放失败的时间。
	@Override
	public void onPlayerError(ExoPlaybackException error) {
	  if (error.type == ExoPlaybackException.TYPE_SOURCE) {
	    IOException cause = error.getSourceException();
	    if (cause instanceof HttpDataSourceException) {
	      // An HTTP error occurred.
	      HttpDataSourceException httpError = (HttpDataSourceException) cause;
	      // This is the request for which the error occurred.
	      DataSpec requestDataSpec = httpError.dataSpec;
	      // It's possible to find out more about the error both by casting and by
	      // querying the cause.
	      if (httpError instanceof HttpDataSource.InvalidResponseCodeException) {
	        // Cast to InvalidResponseCodeException and retrieve the response code,
	        // message and headers.
	      } else {
	        // Try calling httpError.getCause() to retrieve the underlying cause,
	        // although note that it may be null.
	      }
	    }
	  }
	}
(三)、使用 EventLogger
默认情况下,ExoPlayer 仅记录错误。要将播放器事件记录到控制台, EventLogger可以使用该类。它提供的额外日志记录有助于了解播放器正在做什么,以及调试播放问题。 EventLogger实现 AnalyticsListener,因此使用 SimpleExoPlayer注册实例很容易:
player.addAnalyticsListener(new EventLogger(trackSelector));
1、解释日志输出
观察日志的最简单方法是使用 Android Studio 的 logcat选项卡。您可以通过包名称选择您的应用程序作为可调试进程( com.google.android.exoplayer2.demo如果使用演示应用程序),并通过选择“仅显示所选应用程序”告诉logcat选项卡仅记录该应用程序。可以使用表达式进一步过滤日志记录 EventLogger|ExoPlayerImpl,以便仅从日志 EventLogger和播放器本身进行日志记录。
使用Android Studio的logcat选项卡的另一种方法是使用控制台。例如:
adb logcat | grep 'EventLogger\|ExoPlayerImpl'
2、player信息
该 ExoPlayerImpl类提供了两个关于播放器版本,运行应用程序的设备和操作系统以及已加载的 ExoPlayer 模块的重要内容:
    ExoPlayerImpl: Release 2cd6e65 [ExoPlayerLib/2.9.6] [marlin, Pixel XL, Google, 26] [goog.exo.core, goog.exo.ui, goog.exo.dash]
    ExoPlayerImpl: Init 2e5194c [ExoPlayerLib/2.9.6] [marlin, Pixel XL, Google, 26]
3、播放状态
播放器状态更改记录在以下行中。在此示例中,播放永远不会重建(在初始缓冲之后)并且用户暂停一次:
    EventLogger: state [0.00, 0.00, window=0, true, BUFFERING]
    EventLogger: state [0.92, 0.04, window=0, period=0, true, READY]
    EventLogger: state [11.53, 10.60, window=0, period=0, false, READY]
    EventLogger: state [14.26, 10.60, window=0, period=0, true, READY]
    EventLogger: state [131.89, 128.27, window=0, period=0, true, ENDED]
方括号内的元素是:
[float]:自 player 创建以来的挂钟时间。[float]:当前播放位置。[window=int]:当前窗口索引。[period=int]:该窗口中的当前时段。[boolean]:playWhenReady标志。[string]:当前播放状态。
4、媒体曲目
当可用或选定的曲目发生变化时,将记录曲目信息。这在回放开始时至少发生一次。以下示例显示了自适应流的跟踪日志记录:
	EventLogger: tracksChanged [2.32, 0.00, window=0, period=0,
	EventLogger:   Renderer:0 [
	EventLogger:     Group:0, adaptive_supported=YES [
	EventLogger:       [X] Track:0, id=133, mimeType=video/avc, bitrate=261112, codecs=avc1.4d4015, res=426x240, fps=30.0, supported=YES
	EventLogger:       [X] Track:1, id=134, mimeType=video/avc, bitrate=671331, codecs=avc1.4d401e, res=640x360, fps=30.0, supported=YES
	EventLogger:       [X] Track:2, id=135, mimeType=video/avc, bitrate=1204535, codecs=avc1.4d401f, res=854x480, fps=30.0, supported=YES
	EventLogger:       [X] Track:3, id=160, mimeType=video/avc, bitrate=112329, codecs=avc1.4d400c, res=256x144, fps=30.0, supported=YES
	EventLogger:       [X] Track:4, id=136, mimeType=video/avc, bitrate=2400538, codecs=avc1.4d401f, res=1280x720, fps=30.0, supported=YES
	EventLogger:     ]
	EventLogger:   ]
	EventLogger:   Renderer:1 [
	EventLogger:     Group:0, adaptive_supported=YES_NOT_SEAMLESS [
	EventLogger:       [ ] Track:0, id=139, mimeType=audio/mp4a-latm, bitrate=48582, codecs=mp4a.40.5, channels=2, sample_rate=22050, supported=YES
	EventLogger:       [X] Track:1, id=140, mimeType=audio/mp4a-latm, bitrate=127868, codecs=mp4a.40.2, channels=2, sample_rate=44100, supported=YES
	EventLogger:     ]
	EventLogger:   ]
	EventLogger: ]
播放自适应流时,播放期间会记录正在播放的格式的更改以及所选曲目的属性:
	EventLogger: downstreamFormatChanged [3.64, 0.00, window=0, period=0, id=134, mimeType=video/avc, bitrate=671331, codecs=avc1.4d401e, res=640x360, fps=30.0]
	EventLogger: downstreamFormatChanged [3.64, 0.00, window=0, period=0, id=140, mimeType=audio/mp4a-latm, bitrate=127868, codecs=mp4a.40.2, channels=2, sample_rate=44100]
3、解码器选择
在大多数情况下,ExoPlayer使用 MediaCodec从底层平台获取的媒体来呈现媒体。在报告任何播放状态之前,您将找到记录,告诉您哪些解码器已初始化。例如:
    EventLogger: decoderInitialized [0.77, 0.00, window=0, period=0, video, OMX.qcom.video.decoder.avc]
    EventLogger: decoderInitialized [0.79, 0.00, window=0, period=0, audio, OMX.google.aac.decoder]
三、媒体来源
在ExoPlayer中,每个媒体都由 MediaSource代表。ExoPlayer库提供 MediaSource 了多种流类型的实现:
DashMediaSource对于DASH。SsMediaSource对于SmoothStreaming。HlsMediaSource对于HLS。ProgressiveMediaSource对于常规媒体文件。
可以 PlayerActivity在主演示应用程序中找到实例化所有四个的示例。
1、MediaSource组成
除了上面描述的 MediaSource 的实现方式中,ExoPlayer库还提供 ConcatenatingMediaSource , ClippingMediaSource , LoopingMediaSource 和 MergingMediaSource 。这些 MediaSource 实现通过组合实现更复杂的回放功能。一些常见用例如下所述。请注意,尽管在视频播放的 context 中描述了以下一些示例,但它们同样适用于仅音频播放,并且实际上适用于任何支持的媒体类型的播放。
2、播放播放列表
使用支持播放列表 ConcatenatingMediaSource ,可以连续播放多个 MediaSource 。可以通过在播放期间添加,移除和移动 MediaSource 来动态修改播放列表 ConcatenatingMediaSource 。有关详细信息,请参阅播放列表页面。
3、剪辑视频
ClippingMediaSource 可用于剪辑 MediaSource 以便只播放部分内容。以下示例将视频播放剪辑为以5秒开始并以10秒结束。
	MediaSource videoSource =
	    new ProgressiveMediaSource.Factory(...).createMediaSource(videoUri);
	// Clip to start at 5 seconds and end at 10 seconds.
	ClippingMediaSource clippingSource =
	    new ClippingMediaSource(
	        videoSource,
	        /* startPositionUs= */ 5_000_000,
	        /* endPositionUs= */ 10_000_000);
要仅剪辑源的开头, endPositionUs 可以设置为 C.TIME_END_OF_SOURCE 。要仅剪切到特定的持续时间,有一个构造函数接受一个 durationUs 参数。
剪切视频文件的开头时,尽可能将起始位置与关键帧对齐。如果开始位置未与关键帧对齐,则播放器将需要解码并丢弃从先前关键帧到开始位置的数据,然后才能开始播放。这将在播放开始时引入短暂的延迟,包括当播放器转换为播放 ClippingMediaSource播放列表的一部分或由于循环播放时。
4、循环播放视频
要无限循环播放,比起
LoopingMediaSource最好使用ExoPlayer.setRepeatMode。
视频可以使用 LoopingMediaSource 无缝循环固定次数。以下示例播放视频两次。
	MediaSource source =
	    new ProgressiveMediaSource.Factory(...).createMediaSource(videoUri);
	// Plays the video twice.
	LoopingMediaSource loopingSource = new LoopingMediaSource(source, 2);
5、侧加载字幕文件
给定视频文件和单独的字幕文件, MergingMediaSource 可用于将它们合并为单个源以进行回放。
	// Build the video MediaSource.
	MediaSource videoSource =
	    new ProgressiveMediaSource.Factory(...).createMediaSource(videoUri);
	// Build the subtitle MediaSource.
	Format subtitleFormat = Format.createTextSampleFormat(
	    id, // An identifier for the track. May be null.
	    MimeTypes.APPLICATION_SUBRIP, // The mime type. Must be set correctly.
	    selectionFlags, // Selection flags for the track.
	    language); // The subtitle language. May be null.
	MediaSource subtitleSource =
	    new SingleSampleMediaSource.Factory(...)
	        .createMediaSource(subtitleUri, subtitleFormat, C.TIME_UNSET);
	// Plays the video with the sideloaded subtitle.
	MergingMediaSource mergedSource =
	    new MergingMediaSource(videoSource, subtitleSource);
6、先进的结构
可以进一步组合成复杂的 MediaSource 以用于更多不寻常的实例。给定两个视频A和B,以下示例显示如何可以一起使用 LoopingMediaSource 和 ConcatenatingMediaSource 来播放序列(A,A,B)。
	MediaSource firstSource =
	    new ProgressiveMediaSource.Factory(...).createMediaSource(firstVideoUri);
	MediaSource secondSource =
	    new ProgressiveMediaSource.Factory(...).createMediaSource(secondVideoUri);
	// Plays the first video twice.
	LoopingMediaSource firstSourceTwice = new LoopingMediaSource(firstSource, 2);
	// Plays the first video twice, then the second video.
	ConcatenatingMediaSource concatenatedSource =
	    new ConcatenatingMediaSource(firstSourceTwice, secondSource);
以下示例是等效的,表明可以有多种方法来实现相同的结果。
	MediaSource firstSource =
	    new ProgressiveMediaSource.Factory(...).createMediaSource(firstVideoUri);
	MediaSource secondSource =
	    new ProgressiveMediaSource.Factory(...).createMediaSource(secondVideoUri);
	// Plays the first video twice, then the second video.
	ConcatenatingMediaSource concatenatedSource =
	    new ConcatenatingMediaSource(firstSource, firstSource, secondSource);
四、播放列表
使用支持播放列表的 ConcatenatingMediaSource ,可以连续播放多个 MediaSource 。以下示例表示由两个视频组成的播放列表。
	MediaSource firstSource =
	    new ProgressiveMediaSource.Factory(...).createMediaSource(firstVideoUri);
	MediaSource secondSource =
	    new ProgressiveMediaSource.Factory(...).createMediaSource(secondVideoUri);
	// Plays the first video, then the second video.
	ConcatenatingMediaSource concatenatedSource =
	    new ConcatenatingMediaSource(firstSource, secondSource);
播放列表中的项目之间的转换是 无缝 的。并不要求它们具有相同的格式(例如,播放列表包含H264和VP9视频都很好)。它们甚至可以是不同类型的(例如,播放列表包含视频和仅音频流都很好)。允许 MediaSource 在播放列表中多次使用相同的内容。
1、修改播放列表
可以通过在 ConcatenatingMediaSource 中添加,删除和移动 MediaSource 来动态修改播放列表。这可以通过调用相应的 ConcatenatingMediaSource 方法在回放之前和回放期间完成。播放器以正确的方式自动处理播放期间的修改。例如,如果当前正在播放 MediaSource ,则不会中断播放,并且将在完成时播放其新的后继播放。如果当前播放 MediaSource 被移除,则播放器将自动移动到播放第一个剩余的后继者,或者如果不存在这样的后继者则转换到结束状态。
2、识别播放列表项
为了简化播放列表项的识别, MediaSource 可以在工厂类中使用自定义标签设置每个项目 MediaSource ,这可以是uri,标题或任何其他自定义对象。可以使用查询当前正在播放的项目的标签 player.getCurrentTag 。 player.getCurrentTimeline 返回的当前值Timeline 还包含所有标记作为 Timeline.Window 对象的一部分 。
	public void addItem() {
	  // Add mediaId (e.g. uri) as tag to the MediaSource.
	  MediaSource mediaSource =
	      new ProgressiveMediaSource.Factory(...)
	          .setTag(mediaId)
	          .createMediaSource(uri);
	  concatenatedSource.addMediaSource(mediaSource);
	}

	@Override
	public void onPositionDiscontinuity(@Player.DiscontinuityReason int reason) {
	  // Load metadata for mediaId and update the UI.
	  CustomMetadata metadata = CustomMetadata.get(player.getCurrentTag());
	  titleView.setText(metadata.getTitle());
	}
3、检测播放何时转换到另一个项目
当前播放项目更改时,可以调用三种类型的事件:
EventListener.onPositionDiscontinuity与reason = Player.DISCONTINUITY_REASON_PERIOD_TRANSITION。当播放自动从一个项目转换到下一个项目时会发生这种情况EventListener.onPositionDiscontinuity与reason = Player.DISCONTINUITY_REASON_SEEK。当当前播放项目作为搜索操作的一部分而改变时,例如在呼叫时,会发生这种情况Player.next。EventListener.onTimelineChanged与reason = Player.TIMELINE_CHANGE_REASON_DYNAMIC。当播放列表发生更改时会发生这种情况,例如,如果添加,移动或删除项目。
在所有情况下,当您的应用程序代码收到事件时,您可以查询播放器以确定播放列表中正在播放的项目。这可以使用诸如 Player.getCurrentWindowIndex 和 Player.getCurrentTag 之类的方法来完成。如果您只想检测播放列表项目更改,则必须与最后一个已知的窗口索引或标记进行比较,因为上述事件可能由于其他原因而被触发。
五、TrackSelector
曲目选择确定播放器播放哪些可用媒体曲目。轨道选择是TrackSelector的责任,可以在ExoPlayer构建时提供其实例。
	DefaultTrackSelector trackSelector = new DefaultTrackSelector();
	SimpleExoPlayer player =
	    ExoPlayerFactory.newSimpleInstance(context, trackSelector);
DefaultTrackSelector TrackSelector适用于大多数用例的灵活性。使用DefaultTrackSelector 时,可以通过修改它来控制它选择的轨道 Parameters 。这可以在播放之前或播放期间完成。例如,以下代码告诉选择器将视频轨道选择限制为SD,并选择德语音轨(如果有):
	trackSelector.setParameters(
	    trackSelector
	        .buildUponParameters()
	        .setMaxVideoSizeSd()
	        .setPreferredAudioLanguage("deu"));
这是基于约束的轨道选择的示例,其中在不知道实际可用的轨道的情况下指定约束。可以使用指定许多不同类型的约束 Parameters 。 Parameters 也可用于从可用的轨道中选择特定轨道。有关更多详细信息DefaultTrackSelector,请参阅Parameters和ParametersBuilder文档。
六、UI组件
应用程序播放媒体需要用户界面组件来显示媒体和控制播放。ExoPlayer库包含一个包含许多UI组件的UI模块。要依赖UI模块添加依赖项,如下所示,2.X.X您的首选版本在哪里(可以通过查阅发行说明找到最新版本)。
implementation 'com.google.android.exoplayer:exoplayer-ui:2.X.X'
最重要的组件是 PlayerControlView 和 PlayerView 。
PlayerControlView是用于控制播放的视图。它显示标准播放控件,包括播放/暂停按钮,快进和快退按钮以及搜索栏。PlayerView是播放的高级视图。它在播放期间显示视频,字幕和专辑封面,以及使用PlayerControlView播放控件 。
两个视图都有一个 setPlayer 附加和分离(通过传递 null)播放器实例的方法。
1、PlayerView
PlayerView 可用于视频和音频播放。它在视频播放的情况下呈现视频和字幕,并且可以在音频文件中显示作为元数据包括的艺术作品。您可以在布局文件中像其他UI组件中一样,加载PlayerView :
	<com.google.android.exoplayer2.ui.PlayerView
	    android:id="@+id/player_view"
	    android:layout_width="match_parent"
	    android:layout_height="match_parent"
	    app:show_buffering="when_playing"
	    app:show_shuffle_button="true"/>
上面的代码片段说明了PlayerView提供了几个属性。这些属性可用于自定义视图的行为及其外观。这些属性中的大多数都具有相应的setter方法,可用于在运行时自定义视图。该 PlayerView的Javadoc文档中详细介绍这些属性和setter方法。
一旦PlayerView在布局文件中声明,就可以onCreate在活动的方法中查找它:
	@Override
	protected void onCreate(Bundle savedInstanceState) {
	  super.onCreate(savedInstanceState);
	  // ...
	  playerView = findViewById(R.id.player_view);
	}
当player初始化时,可以通过调用setPlayer以下内容将其附加到视图 :
	// Instantiate the player.
	player = ExoPlayerFactory.newSimpleInstance(context);
	// Attach player to the view.
	playerView.setPlayer(player);
	// Prepare the player with the dash media source.
	player.prepare(createMediaSource());
2、选择Surface类型
该surface_type属性PlayerView可让您设置用于视频播放的Surface类型。除了值spherical_view(这是球形视频播放一个特殊的值)时,允许值是surface_view, texture_view和none。如果视图仅用于音频播放,则应使用none以避免必须创建Surface,因为这样做可能耗费资源。
如果视图是用于常规视频播放那么 surface_view 或 texture_view 应该使用。对于视频播放,相比TextureView,SurfaceView有许多好处:
- 显着降低了许多设备的功耗。
- 更准确的帧定时,使视频播放更流畅。
- 播放受DRM保护的内容时支持安全输出。
因此,相比较于TextureView,SurfaceView应尽可能优先考虑。 TextureView只有在SurfaceView不符合您需求的情况下才能使用。一个示例是在Android N之前需要平滑动画或滚动视频表面,如下所述。对于这种情况,最好 TextureView 只在SDK_INT小于24(Android N)时使用, 否则,使用SurfaceView。
SurfaceView在Android N之前,渲染未与视图动画正确同步。在早期版本SurfaceView中,当放入滚动容器或受到动画影响时,这可能会导致不必要的效果 。这些效果包括视图的内容看起来略微落后于它应该显示的位置,并且视图在受到动画时变黑。为了在Android N之前实现流畅的动画或视频滚动,因此必须使用TextureView而不是SurfaceView。
3、PlayerControlView
当使用 PlayerView 时, PlayerControlView 在内部用于提供播放控制。对于特定用例 PlayerControlView ,也可以用作独立组件。它可以像任何其他UI组件一样包含在布局文件中:
	<com.google.android.exoplayer2.ui.PlayerControlView
	    android:id="@+id/player_control_view"
	    android:layout_width="match_parent"
	    android:layout_height="match_parent"/>
比起 PlayerView , PlayerControlView 的Javadoc更详细地记录了可用的属性和setter方法。查找 PlayerControlView 并将播放器附加到视图与使用时类似PlayerView:
	@Override
	protected void onCreate(Bundle savedInstanceState) {
	  super.onCreate(savedInstanceState);
	  // ...
	  playerControlView = findViewById(R.id.player_control_view);
	}

	private void initializePlayer() {
	  // Instantiate the player.
	  player = ExoPlayerFactory.newSimpleInstance(context);
	  // Attach player to the view.
	  playerControlView.setPlayer(player);
	  // Prepare the player with the dash media source.
	  player.prepare(createMediaSource());
	}
4、覆盖布局文件
当PlayerView被实例化后,它从布局文件 exo_player_view.xml扩展 (inflate) 它的布局。PlayerControlView从 exo_player_control_view.xml中扩展其布局。要自定义这些布局,应用程序可以在其自己的res/layout*目录中定义具有相同名称的布局文件。这些布局文件会覆盖ExoPlayer库提供的文件。
例如,假设我们希望我们的播放控件仅包含位于视图中心的播放/暂停按钮。我们可以通过exo_player_control_view.xml在应用程序的res/layout 目录中创建文件来实现这一点,包含:
	<FrameLayout xmlns:android="http://schemas.android.com/apk/res/android"
	    android:layout_width="match_parent"
	    android:layout_height="match_parent">

	  <ImageButton android:id="@id/exo_play"
	      android:layout_width="100dp"
	      android:layout_height="100dp"
	      android:layout_gravity="center"
	      android:background="#CC000000"
	      style="@style/ExoMediaButton.Play"/>

	  <ImageButton android:id="@id/exo_pause"
	      android:layout_width="100dp"
	      android:layout_height="100dp"
	      android:layout_gravity="center"
	      android:background="#CC000000"
	      style="@style/ExoMediaButton.Pause"/>

	</FrameLayout>
与标准对照相比,视觉外观的变化如下所示。

5、自定义布局文件
覆盖布局文件是改变整个应用程序布局的绝佳解决方案,但是如果仅在一个地方需要自定义布局呢?要实现这一点,首先要定义一个布局文件,就像覆盖其中一个默认布局一样,但这次给它一个不同的文件名custom_controls.xml。其次,使用属性指示在对视图进行扩展(inflate)时应使用此布局。例如,在使用时 PlayerView,可以使用以下controller_layout_id属性指定扩展(inflate)以提供播放控件的布局:
	<com.google.android.exoplayer2.ui.PlayerView
		 android:id="@+id/player_view"
	     android:layout_width="match_parent"
	     android:layout_height="match_parent"
	     app:controller_layout_id="@layout/custom_controls"/>
七、下载媒体
ExoPlayer提供下载媒体以进行离线播放的功能。在大多数用例中,即使您的应用程序处于后台,也可以继续下载。对于这些用例,您的应用程序应该是子类DownloadService,并将命令发送到服务以添加,删除和控制下载。下图显示了涉及的主要类。
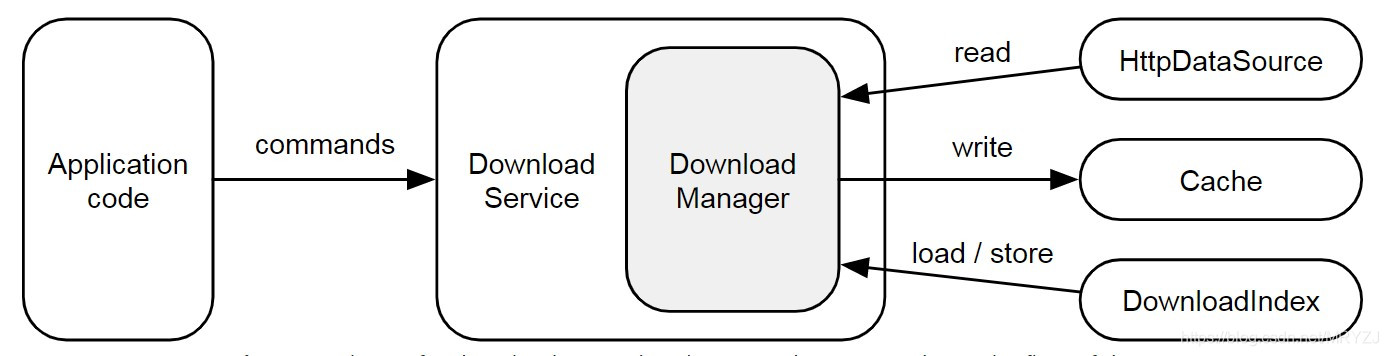
DownloadService:包装DownloadManager并转发命令。该服务允许DownloadManager即使应用程序在后台运行也能继续运行。DownloadManager:管理多个下载,根据网络连接等要求加载(和存储)来自(和)DownloadIndex的状态,启动和停止下载。要下载内容,管理员通常会读取从HttpDataSource下载的数据 ,并将其写入Cache。DownloadIndex:保持下载状态。
1、创建DownloadService
要创建一个DownloadService,您需要将其子类化并实现其抽象方法:
getDownloadManager():返回DownloadManager要使用的。getScheduler():返回一个可选项Scheduler,可以在满足挂起下载进度所需的需求时重新启动服务。ExoPlayer提供两种实现:PlatformScheduler,它使用JobScheduler。JobDispatcherScheduler,它使用 Firebase JobDispatcher。
getForegroundNotification():返回服务在前台运行时要显示的通知。您可以使用DownloadNotificationHelper.buildProgressNotification默认样式创建通知。
最后,您需要在AndroidManifest.xml文件中定义服务:
	<service android:name="com.myapp.MyDownloadService"
	    android:exported="false">
	  <!-- This is needed for Scheduler -->
	  <intent-filter>
	    <action android:name="com.google.android.exoplayer.downloadService.action.RESTART"/>
	    <category android:name="android.intent.category.DEFAULT"/>
	  </intent-filter>
	</service>
见DemoDownloadService和AndroidManifest.xml在一个具体的例子中ExoPlayer演示应用程序。
2、创建 DownloadManager
下面的代码片段演示了如何实例化一个DownloadManager,可以通过返回getDownloadManager()在DownloadService:
	// Note: This should be a singleton in your app.
	databaseProvider = new ExoDatabaseProvider(context);

	// A download cache should not evict media, so should use a NoopCacheEvictor.
	downloadCache = new SimpleCache(
	    downloadDirectory,
	    new NoOpCacheEvictor(),
	    databaseProvider);

	// Create a factory for reading the data from the network.
	dataSourceFactory = new DefaultHttpDataSourceFactory(userAgent);

	// Create the download manager.
	downloadManager = new DownloadManager(
	    context,
	    databaseProvider,
	    downloadCache,
	    dataSourceFactory);

	// Optionally, setters can be called to configure the download manager.
	downloadManager.setRequirements(requirements);
	downloadManager.setMaxParallelDownloads(3);
请参阅DemoApplication演示应用程序中的具体示例。
演示应用程序中的示例还从旧
ActionFile实例导入下载状态。只有ActionFile在ExoPlayer 2.10.0之前使用您的应用程序时才需要这样做。
3、添加下载
要添加下载,您需要创建一个DownloadRequest并将其发送给您 DownloadService。对于自适应流,DownloadHelper可以用来帮助构建一个DownloadRequest,如本页后面所述。以下示例显示了如何为渐进式流创建下载请求:
	DownloadRequest downloadRequest = new DownloadRequest(
	    contentId,
	    DownloadRequest.TYPE_PROGRESSIVE,
	    contentUri,
	    /* streamKeys= */ Collections.emptyList(),
	    /* customCacheKey= */ null,
	    appData);
contentId是内容的唯一标识符,appData是应用程序希望与下载关联的任何数据。在简单的情况下, contentUri通常可以使用contentId,但应用程序可以自由使用任何最适合其用例的ID方案。
创建后,可以将请求发送DownloadService到添加下载:
	DownloadService.sendAddDownload(
	    context,
	    MyDownloadService.class,
	    downloadRequest,
	    /* foreground= */ false)
MyDownloadServiceapp的DownloadService子类在哪里, foreground参数控制是否在前台启动服务。如果你的应用程序已经在前台,那么foreground通常应该将参数设置为false,因为DownloadService如果它确定它有工作要做,它将把自己置于前台。
4、删除下载
可以通过发送删除命令来删除下载DownloadService,其中contentId标识要删除的下载:
	DownloadService.sendRemoveDownload(
	    context,
	    MyDownloadService.class,
	    contentId,
	    /* foreground= */ false)
您还可以删除所有下载的数据 DownloadService.sendRemoveAllDownloads。
5、启动和停止下载
只有满足四个条件时才会下载:
- 下载没有停止原因(见下文)。
- 下载不会暂停。
- 满足下载进度的要求。要求可以指定对允许的网络类型的约束,以及设备是空闲还是连接到充电器。
- 不超过最大并行下载数。
所有这些条件都可以通过发送命令来控制 DownloadService。
(1)、设置和清除下载停止原因
可以设置停止一个或所有下载的原因:
	// Set the stop reason for a single download.
	DownloadService.sendSetStopReason(
	    context,
	    MyDownloadService.class,
	    contentId,
	    stopReason,
	    /* foreground= */ false);

	// Clear the stop reason for a single download.
	DownloadService.sendSetStopReason(
	    context,
	    MyDownloadService.class,
	    contentId,
	    Download.STOP_REASON_NONE,
	    /* foreground= */ false);
stopReason可以是任何非零值(Download.STOP_REASON_NONE = 0是一个特殊值,意味着下载没有停止)。有多种停止下载原因的应用可以使用不同的值来跟踪每次下载停止的原因。设置和清除所有下载的停止原因与设置和清除单个下载的停止原因的方式相同,但contentId应设置为null。
当下载具有非零停止原因时,它将处于该 Download.STATE_STOPPED状态。
(2)、暂停和恢复所有下载
所有下载都可以暂停并恢复如下:
	// Pause all downloads.
	DownloadService.sendPauseDownloads(
	    context,
	    MyDownloadService.class,
	    /* foreground= */ false);

	// Resume all downloads.
	DownloadService.sendResumeDownloads(
	    context,
	    MyDownloadService.class,
	    /* foreground= */ false);
下载暂停时,它将处于该Download.STATE_QUEUED状态。
(3)、设置下载要求的进度
Requirements可用于指定下载继续进行必须满足的约束。可以通过DownloadManager.setRequirements()在创建时调用来设置要求 DownloadManager,如上例所示。它们也可以通过向以下命令发送命令来动态更改DownloadService:
	// Set the download requirements.
	DownloadService.sendSetRequirements(
	    context,
	    MyDownloadService.class,
	    requirements,
	    /* foreground= */ false);
如果由于未满足要求而无法继续下载,则它将处于该Download.STATE_QUEUED状态。您可以使用查询不满足的要求DownloadManager.getNotMetRequirements()。
(4)、设置最大并行下载数
可以通过调用设置最大并行下载数 DownloadManager.setMaxParallelDownloads()。这通常在创建时完成DownloadManager,如上例所示。
如果由于最大并行下载数量已在进行而无法继续下载,则它将处于该Download.STATE_QUEUED状态。
6、查询下载
DownloadManager的DownloadIndex可以查询所有下载,包括那些已完成或失败的状态。可以通过调用DownloadManager.getDownloadIndex()来获得该DownloadIndex 。然后可以通过调用DownloadIndex.getDownloads()获得迭代所有下载的游标 。或者,可以通过调用DownloadIndex.getDownload()查询单个下载的状态。
DownloadManager还提供DownloadManager.getCurrentDownloads(),仅返回当前状态(即未完成或失败)的下载。此方法对于更新显示当前下载的进度和状态的通知和其他UI组件非常有用。
7、听取下载
您可以添加一个侦听器,DownloadManager以便在当前下载更改状态时收到通知:
	downloadManager.addListener(
	    new DownloadManager.Listener() {
	      // Override methods of interest here.
	    });
请参阅DownloadManagerListener演示应用程序[DownloadTracker](https://github.com/google/ExoPlayer/tree/release-v2/demos/main/src/main/java/com/google/android/exoplayer2/demo/DownloadTracker.java)类中的具体示例。
下载进度更新不会触发调用
DownloadManager.Listener。要更新显示下载进度的UI组件,您应该定期查询DownloadManager所需的更新速率。DownloadService包含此示例,定期更新服务前台通知。
8、播放下载的内容
播放下载的内容类似于播放在线内容,除了从下载Cache而不是通过网络读取数据。
请勿直接从下载目录中尝试读取文件,这一点很重要。而是使用如下所述的ExoPlayer库类。
要播放下载的内容,请使用用于下载CacheDataSourceFactory的相同Cache实例创建一个。使用此工厂类,构建一个MediaSource播放。您应该使用原始内容contentUri(即下载的内容)构建MediaSource,而不是指向下载目录或其中任何文件的URI。
	CacheDataSourceFactory dataSourceFactory = new CacheDataSourceFactory(
	    downloadCache, upstreamDataSourceFactory);
	ProgressiveMediaSource mediaSource = new ProgressiveMediaSource
	    .Factory(dataSourceFactory)
	    .createMediaSource(contentUri);
	player.prepare(mediaSource);
9、下载和播放自适应流
自适应流(例如DASH,SmoothStreaming和HLS)通常包含多个媒体轨道。通常有多个轨道包含不同质量的相同内容(例如SD,HD和4K视频轨道)。可能还存在包含不同内容的相同类型的多个轨道(例如,不同语言的多个音轨)。
对于流式播放,可以使用轨道选择器来选择播放哪个轨道。类似地,对于下载,DownloadHelper可以使用来选择下载哪个轨道。DownloadHelper的典型用法如下:
- 使用其中一种
DownloadHelper.forXXX方法构建一个DownloadHelper。 - 使用
prepare(DownloadHelper.Callback)并准备帮助程序并等待回调。
	DownloadHelper downloadHelper =
	    DownloadHelper.forDash(
	        contentUri,
	        dataSourceFactory,
	        new DefaultRenderersFactory(context));
	downloadHelper.prepare(myCallback);
- 可以选择使用检查默认选定的曲目
getMappedTrackInfo和getTrackSelections,使用clearTrackSelections,replaceTrackSelections和addTrackSelection进行调整。 - 通过调用
getDownloadRequest为所选曲目创建一个DownloadRequest。如上所述,请求可以传递给DownloadService添加下载。 - 使用
release()释放helper。
您可以通过调用DownloadHelper.createMediaSource以下内容创建MediaSource播放 :
	MediaSource mediaSource =
	    DownloadHelper.createMediaSource(downloadRequest, dataSourceFactory);
创建MediaSource的人知道已下载了哪些曲目,因此只会在播放期间尝试使用这些曲目。请参阅 PlayerActivity 演示应用程序中的具体示例。
个人网站:分享客(https://sharerdiary.com/)
这个网站经常分享一些免费视频、免费音乐、实用工具和各种福利,感兴趣的朋友可以看看!
您的关注和点赞是我分享的动力,如有帮助请勿吝啬!ヽ( ̄▽ ̄)ノ
转载自原文链接, 如需删除请联系管理员。
原文链接:ExoPlayer详解——入门(官方文档),转载请注明来源!