说实话,Gitlab的数据库配置还是挺复杂的,需要修改的配置文件也挺多的,主要有如下步骤:1、创建数据库。2、在
/etc/gitlab/gitlab.rb文件中,添加数据库的配置,3、给gitlab安装mysql的依赖。4、执行gitlab-rake gitlab:check检查配置文件,这个地方错误比较的多,5、没有错误后,重启服务器,设置管理员密码。
1、创建数据库
#设定可以增加触发器和存储过程,在新版本的gitlab中,需要设定。
SET GLOBAL log_bin_trust_function_creators=1;

#创建数据库
create database gitlab DEFAULT CHARACTER SET utf8 COLLATE utf8_general_ci;

#添加权限
GRANT ALL PRIVILEGES ON gitlab.*TO 'gitlab'@'%' IDENTIFIED BY 'gitlab' WITH GRANT OPTION;

#刷新权限
flush privileges;
2、配置gitlab.rb,添加mysql
vim /etc/gitlab/gitlab.rb

#修改数据库配置
gitlab_rails['db_adapter'] = "mysql2"
gitlab_rails['db_encoding'] = "utf8"
gitlab_rails['db_database'] = "gitlab"
gitlab_rails['db_username'] = "gitlab"
gitlab_rails['db_password'] = "gitlab"
gitlab_rails['db_host'] = "127.0.0.1"
gitlab_rails['db_port'] = 3306
postgresql['enable'] = false
3、配置gitlab的依赖
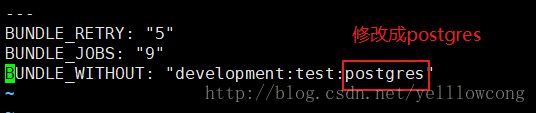
3.1去掉掉postgres依赖
#缺少 mysql2,用ruby的gem工具下载一个,在下载之前,得先配置下ruby的gem与bundle
#编辑config
vim /opt/gitlab/embedded/service/gitlab-rails/.bundle/config
#通过sed来搞替换你操作
sed -i s#mysql#postgers#g /opt/gitlab/embedded/service/gitlab-rails/.bundle/config
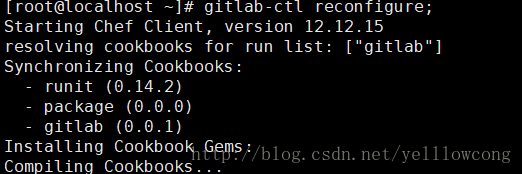
#更改完事后,重新配置一下
gitlab-ctl reconfigure将原来的mysql替换成postgres,我们不需要postgers的包了。

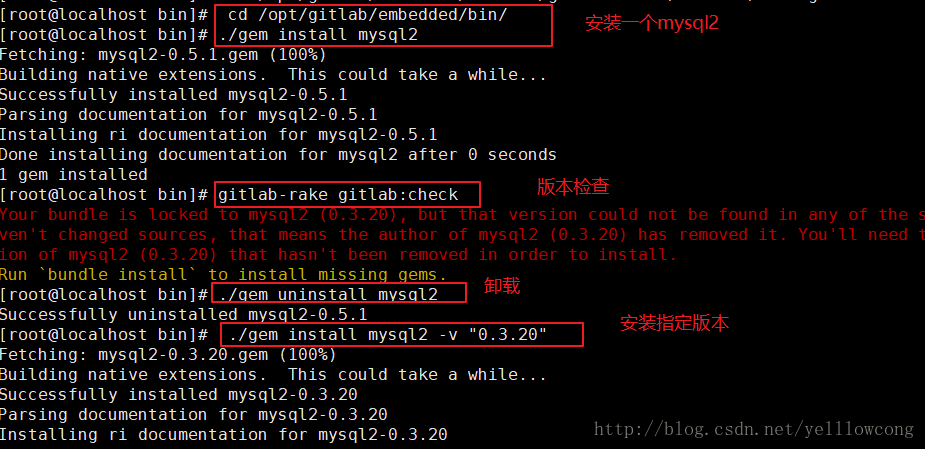
3.2安装mysql依赖
安装依赖,需要指定版本,可以先安装后,在执行gitlab-rake gitlab:check查看安装的版本。
## gitlab几乎所有的命令都在此目录下
 cd /opt/gitlab/embedded/bin/

##安装mysql
./gem install mysql2

#删除mysql
./gem uninstall mysql2

#安装指定版本
./gem install mysql2 -v "0.3.20"

#查看版本
./gem list | grep mysql
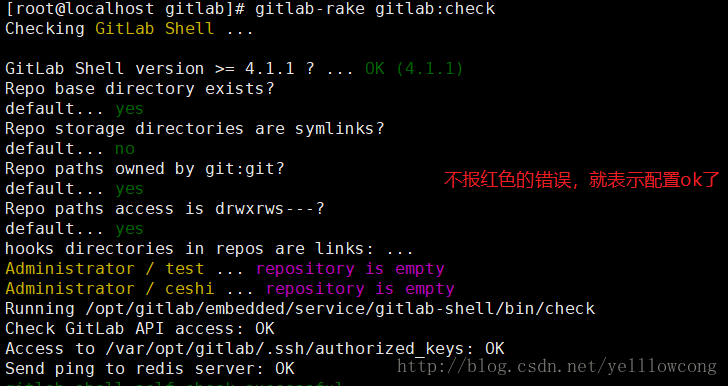
4、检查配置
这个检查,是为了保证咋们的配置绝对的正确。不然直接搞,会死得很惨的。这个地方会有很多错误的,具体可以看我的常见问题,说不定有一样的。
#查看配置是否ok,如果数据库ok了 可以直接执行gitlab-rake gitlab:setup,来创建数据库的表。
gitlab-rake gitlab:check
检查配置信息
5、初始化gitlab
执行gitlab-rake gitlab:setup命令,来初始化gitlab.
#初始化gitlab
gitlab-rake gitlab:setup
我们执行了gitlab-rake gitlab:setup 之后,会提示以前的数据信息会丢失掉。当然我们不设定为yes,后面咋玩啊。
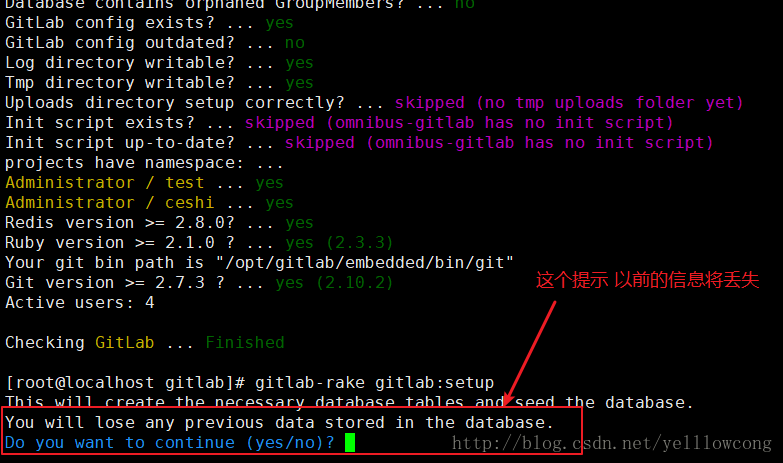
成功后之后,就会创建一个root用户

6、重启服务
#####后面几个gitlab-ctl 常用命令,这次配置用不到
#配置服务
gitlab-ctl reconfigure;

#重启服务
gitlab-ctl restart;

#查看启动情况
gitlab-ctl tail
7、查看数据库信息
可以看到数据库中,多出了好多张表,然后服务也正常启动了
#可以看到好多表已经自动创建了。
 show tables;
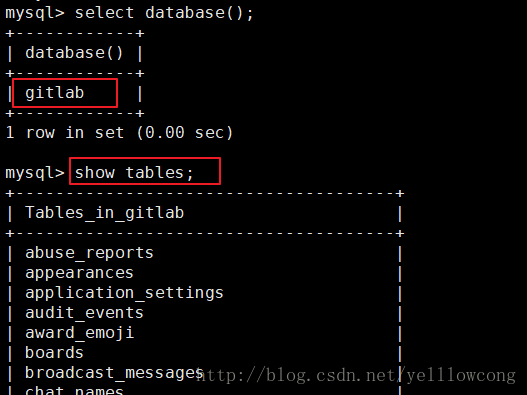
服务正常启动
常见问题
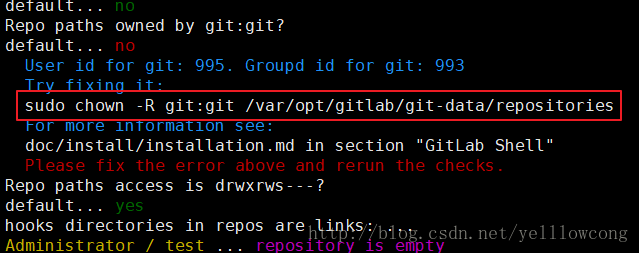
1、仓库存储目录权限
人家提供了解决方案了,解决办法就是给仓库设定gt用户的权限 sudo chown -R git:git /var/opt/gitlab/git-data/repositories
default... no
  User id for git: 995. Groupd id for git: 993
  Try fixing it:
  sudo chown -R git:git /var/opt/gitlab/git-data/repositories
  For more information see:
  doc/install/installation.md in section "GitLab Shell"
  Please fix the error above and rerun the checks.
2、gitlab没有mysql2的依赖
Specified 'mysql2' for database adapter, but the gem is not loaded. Add `gem 'mysql2'` to your Gemfile (and ensure its version is at the minimum required by ActiveRecord). excluded from capture due to environment or should_capture callback解决办法,安装依赖
#到bin目录下,执行gem的命令
cd /opt/gitlab/embedded/bin

#安装指定版本的mysql驱动
gem install mysql2 -v "0.3.20"
3、gitlab找不到表的问题
如果驱动安装成功后,执行gitlab-rake gitlab:check,如果是表不存在,可以执行下面代码,来创建表。
gitlab-rake gitlab:setup4、gitlab-shell self-check failed
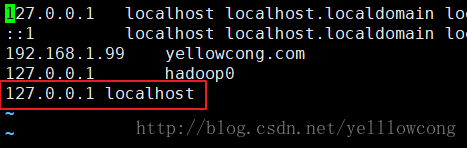
自动检查失败,导致这个问题的原因是没找到自己的服务器,解决方案是在本地的hosts中指向自己的服务器。
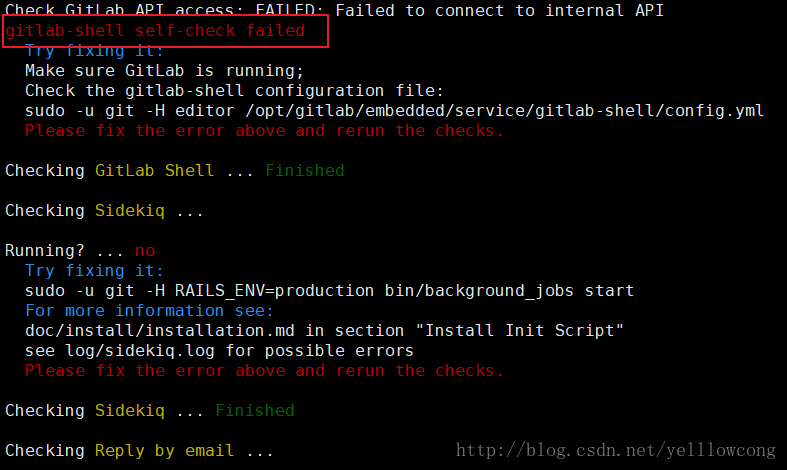
解决方案,/etc/hosts添加 127.0.0.1 localhost 就可以了、我先测试功能
vim /etc/hosts

#添加
127.0.0.1 localhost
装不上插件的情况
参考文章
http://blog.51cto.com/207698/2133703
参考文章
https://docs.gitlab.com/omnibus/settings/database.html
http://www.mamicode.com/info-detail-1688017.html
https://blog.csdn.net/shilei_zhang/article/details/77568505
转载自原文链接, 如需删除请联系管理员。
原文链接:Gitlab之设定数据库-yellowcong,转载请注明来源!