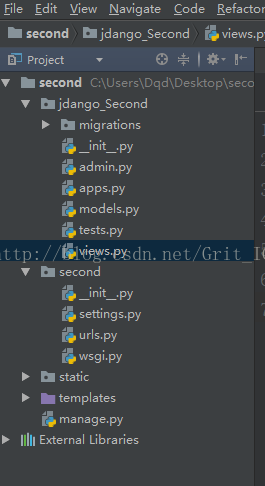
一、首先我们使用pycharm创建一个jdango项目
app名称为jdango_Second,创建好的格式如图所示:

二、我们创建的项目是MTV模式的
即model(对应数据库),templates(页面显示),view(逻辑处理)
models.py:
from django.db import models

# Create your models here.
class Stu(models.Model):
    id = models.CharField(max_length=16,primary_key=True)
    name=models.CharField(default='dqd',max_length=16)
views.py:
from django.shortcuts import render
from jdango_Second.models import Stu
# Create your views here.
def showInfo(request):
    stu_list = Stu.objects.all()
    content = {'list':stu_list}
    return render(request,'index.html',content)
在admin.py将models.py中的类注册:
from django.contrib import admin
from jdango_Second.models import Stu
# Register your models here.
admin.site.register(Stu)
在项目的__init__.py我们可以做一些初始化(second):
import pymysql
pymysql.install_as_MySQLdb()

db = pymysql.connect("localhost",'root','','py_second')

cursor = db.cursor()

cursor.execute('SELECT VERSION()')

data = cursor.fetchone()

print("Version is %s" % data)

db.close()
同样在项目的setting.py中我们设置链接的数据库和制定静态路径和templates的路径:
"""
Django settings for second project.

Generated by 'django-admin startproject' using Django 1.11.2.

For more information on this file, see
https://docs.djangoproject.com/en/1.11/topics/settings/

For the full list of settings and their values, see
https://docs.djangoproject.com/en/1.11/ref/settings/
"""

import os

# Build paths inside the project like this: os.path.join(BASE_DIR, ...)
BASE_DIR = os.path.dirname(os.path.dirname(os.path.abspath(__file__)))


# Quick-start development settings - unsuitable for production
# See https://docs.djangoproject.com/en/1.11/howto/deployment/checklist/

# SECURITY WARNING: keep the secret key used in production secret!
SECRET_KEY = 'z=%7&(7pk#$)=2h+gs#kz9479#cvd1%1f#sd98nzz-#18ke0(2'

# SECURITY WARNING: don't run with debug turned on in production!
DEBUG = True

ALLOWED_HOSTS = []


# Application definition

INSTALLED_APPS = [
    'django.contrib.admin',
    'django.contrib.auth',
    'django.contrib.contenttypes',
    'django.contrib.sessions',
    'django.contrib.messages',
    'django.contrib.staticfiles',
    'jdango_Second.apps.JdangoSecondConfig',
]

MIDDLEWARE = [
    'django.middleware.security.SecurityMiddleware',
    'django.contrib.sessions.middleware.SessionMiddleware',
    'django.middleware.common.CommonMiddleware',
    'django.middleware.csrf.CsrfViewMiddleware',
    'django.contrib.auth.middleware.AuthenticationMiddleware',
    'django.contrib.messages.middleware.MessageMiddleware',
    'django.middleware.clickjacking.XFrameOptionsMiddleware',
]

ROOT_URLCONF = 'second.urls'

TEMPLATES = [
    {
        'BACKEND': 'django.template.backends.django.DjangoTemplates',
        'DIRS': [os.path.join(BASE_DIR, 'templates')]
        ,
        'APP_DIRS': True,
        'OPTIONS': {
            'context_processors': [
                'django.template.context_processors.debug',
                'django.template.context_processors.request',
                'django.contrib.auth.context_processors.auth',
                'django.contrib.messages.context_processors.messages',
            ],
        },
    },
]

WSGI_APPLICATION = 'second.wsgi.application'


# Database
# https://docs.djangoproject.com/en/1.11/ref/settings/#databases

DATABASES = {
    #'default': {
    #    'ENGINE': 'django.db.backends.sqlite3',
    #    'NAME': os.path.join(BASE_DIR, 'db.sqlite3'),
    #}
    'default': {
        'ENGINE': 'django.db.backends.mysql',
        'NAME': 'py_second',
        'USER': 'root',
        'PASSWORD': '',
        'HOST': '127.0.0.1',
        'port': '3306',
    }
}


# Password validation
# https://docs.djangoproject.com/en/1.11/ref/settings/#auth-password-validators

AUTH_PASSWORD_VALIDATORS = [
    {
        'NAME': 'django.contrib.auth.password_validation.UserAttributeSimilarityValidator',
    },
    {
        'NAME': 'django.contrib.auth.password_validation.MinimumLengthValidator',
    },
    {
        'NAME': 'django.contrib.auth.password_validation.CommonPasswordValidator',
    },
    {
        'NAME': 'django.contrib.auth.password_validation.NumericPasswordValidator',
    },
]


# Internationalization
# https://docs.djangoproject.com/en/1.11/topics/i18n/

LANGUAGE_CODE = 'en-us'

TIME_ZONE = 'UTC'

USE_I18N = True

USE_L10N = True

USE_TZ = True


# Static files (CSS, JavaScript, Images)
# https://docs.djangoproject.com/en/1.11/howto/static-files/

STATIC_URL = '/static/'

STATIC_PATH = os.path.join(BASE_DIR,'static')
STATICFILES_DIRS = (
    STATIC_PATH,
)

TEMPLATE_PATH = os.path.join(BASE_DIR,'templates')
TEMPLATE_DIRS=[
    TEMPLATE_PATH,
]
项目的urls.py中配置浏览器地址栏的路径和views.py中的函数名称对应起来:
from django.conf.urls import url
from django.contrib import admin
from jdango_Second.views import showInfo

urlpatterns = [
    url(r'^admin/',admin.site.urls),
    url(r'^index/',showInfo),
]
static路径下用于放置各种静态文件,如:
static
img
1.png
js
css
templates的路径为:
templates
index.html
index.html:
<!DOCTYPE html>
{% load staticfiles %}
<html lang="en">
<head>
    <meta charset="UTF-8">
    <title>Title</title>
</head>
<body>

<image src="{% static 'img/1.jpg' %}"/>
<ul>
    {%for item in list%}
        <li>
            {{ item.id }}
            {{ item.name }}
        </li>
    {% endfor %}
</ul>
</body>
</html>

初始化数据库表
manage.py@HelloDj > makemigrations
manage.py@HelloDj > migrate
2.3 创建admin user
manage.py@HelloDj >createsuperuser
输入用户。。密码。。
(参考:http://blog.csdn.net/wengyupeng/article/details/52266635)
四、打开浏览器输入localhost:8000/admin进入如下界面:
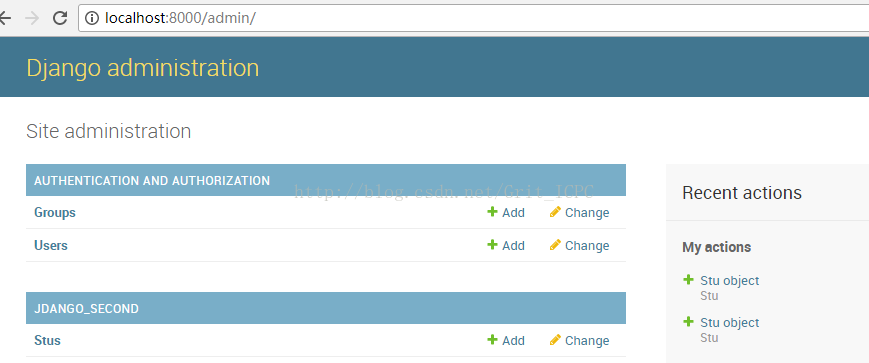
点击Stus,进入增添数据即可,然后在在地址栏输入localhost:8000/index就可以看到数据库中取出的数据了
转载自原文链接, 如需删除请联系管理员。
原文链接:python使用jdango创建web项目完整步骤,转载请注明来源!