准备工作,安装好Ubuntu后,修改源设置,见 https://blog.csdn.net/randyran/article/details/86564754 中的第1步,以加快apt-get install X的速度。
CuraEngine编译
1. 编译安装protobuf
(1)安装必要工具
sudo apt-get install autoconf automake libtool curl make g++ git
(2)下载 protobuf 库
git clone https://github.com/protocolbuffers/protobuf
(3) cd protobuf
(4) git submodule update --init --recursive
(5) ./autogen.sh
(6) ./configure
(7) make -j4
(8) make check
(9) sudo make install
(10) sudo ldconfig #refresh shared library cache
2. 安装CMake
(1) sudo apt-get install build-essential
(2) wget http://www.cmake.org/files/v3.13/cmake-3.13.3.tar.gz
(3) tar xvf cmake-3.13.3.tar.gz
(4) cd cmake-3.13.3
(5) ./configure
(6) make -j4
(7) sudo apt-get install checkinstall
(8) sudo checkinstall
(9) sudo make install
3. 安装python3.6及python3.6-dev(Ubuntu18.04自带Python3.6)
(1) sudo add-apt-repository ppa:jonathonf/python-3.6,随后按Enter确认
(3) sudo apt-get update
(4) sudo apt-get install python3.6
(5) sudo apt-get install python3.6-dev
4. 安装python3-sip-dev
sudo apt-get install python3-sip-dev
5. 编译libArcus库
git clone https://github.com/Ultimaker/libArcus.git
cd libArcus
mkdir build && cd build
cmake ..
make
sudo make install
6. 升级至C++11(如果是Ubuntu16及以上的用户可以略过此步骤)
sudo add-apt-repository ppa:ubuntu-toolchain-r/test
sudo apt-get update
sudo apt-get install gcc-4.9 gcc-4.9-multilib g++-4.9 g++-4.9-multilib
sudo update-alternatives --install /usr/bin/gcc gcc /usr/bin/gcc-4.9 50
sudo update-alternatives --install /usr/bin/g++ g++ /usr/bin/g++-4.9 90
sudo update-alternatives --config gcc
sudo update-alternatives --config g++
7. 编译安装CuraEngine
git clone https://github.com/Ultimaker/CuraEngine.git
cd CuraEngine
mkdir build && cd build
cmake ..
make
(参考 https://blog.csdn.net/phmatthaus/article/details/84143704 )
Cura编译
本调试环境为Ubuntu 18.04 + Python 3.6 + Pycharm,环境配置见 https://blog.csdn.net/randyran/article/details/86564754
1. 安装依赖库(git cmake已经在编译CuraEngine时安装了)
sudo apt-get install zlib1g-dev
sudo apt-get install python3-scipy python3-pip
sudo pip3 install Shapely -i https://pypi.tuna.tsinghua.edu.cn/simple
sudo pip3 install pyserial PyQt5==5.10 -i https://pypi.tuna.tsinghua.edu.cn/simple
2. 安装SIP
(1) 下载SIP 4.19.2+
https://www.riverbankcomputing.com/software/sip/download
(2) 解压
tar xvf sip-4.19.13.tar.gz
(3) In the Terminal, navigate to the extracted folder:
$ cd [SIP PATH]
(4) Next, we will install SIP by running the following commands:
$ python3 configure.py
$ make
$ sudo make install
3. Savitar(目前使用的3.6 branch,master 4.0未测试)
(1) clone the libSavitar repository to a directory of your choosing (replace [LIBSAVITAR PATH]):
$ git clone https://github.com/Ultimaker/libSavitar.git [LIBSAVITAR PATH]
(2) Go to the repository directory, and create a build directory and switch to it:
$ cd [LIBSAVITAR PATH]
$ mkdir build && cd build
(3) Configure and build libSavitar using the following commands:
$ cmake -DCMAKE_BUILD_TYPE=Release -DCMAKE_INSTALL_PREFIX=$VIRTUAL_ENV -DCMAKE_PREFIX_PATH=$VIRTUAL_ENV -DBUILD_STATIC=ON -DBUILD_PYTHON=ON -DBUILD_EXAMPLES=OFF ..
$ make -j4
$ sudo make install
4. Charon
clone the libCharon repository to a directory of your choosing (replace [LIBCHARON PATH]):
$ git clone https://github.com/Ultimaker/libCharon.git
[LIBCHARON PATH]
Go to the repository directory, and create a build directory and switch to it:
$ cd [LIBCHARON PATH]
$ mkdir build && cd build
Configure and build libCharon using the following commands:
$ cmake -DCMAKE_BUILD_TYPE=Release -DCMAKE_INSTALL_PREFIX=$VIRTUAL_ENV -DCMAKE_PREFIX_PATH=$VIRTUAL_ENV ..
$ make -j4
$ sudo make install
5. CuraEngine
Clone the CuraEngine repository to a directory of your choosing (replace [CURAENGINE PATH]):
$ git clone https://github.com/Ultimaker/CuraEngine.git [CURAENGINE PATH]
Go to the repository directory, and create a build directory and switch to it:
$ cd [CURAENGINE PATH]
$ mkdir build && cd build
Configure and build CuraEngine using the following commands:
$ cmake ..
$ make -j4
$ sudo make install
6. Cura & Uranium
Clone the Cura, Uranium, and fdm_materials repositories to directories of your choosing (replace [CURA PATH], [URANIUM PATH], and [FDM_MATERIALS PATH]):
$ git clone https://github.com/Ultimaker/Cura.git [CURA PATH]
$ git clone https://github.com/Ultimaker/Uranium.git [URANIUM PATH]
$ git clone https://github.com/Ultimaker/fdm_materials.git [FDM_MATERIALS PATH]
7. 链接模块及库
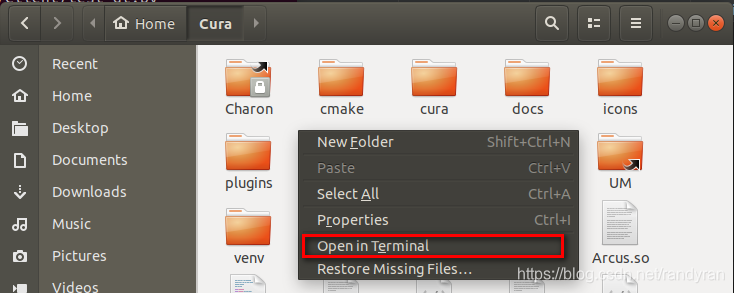
在Cura目录下执行“Open in Terminal”,依次执行步骤将模块和库软链接至Cura目录下

(1)Charon
ln -s /lib/python3/dist-packages/Charon .
(2)Uranium目录下的UM
ln -s /home/[你的用户名]/Uranium/UM .
(3)Arcus
ln -s /usr/local/lib/python3/dist-packages/Arcus.so .
(4)Savitar
ln -s /lib/python3/dist-packages/Savitar.so .
(5)CuraEngine
ln -s /home/ryl/CuraEngine/build/CuraEngine .

8. 将材质配置文件拷贝至Cura/resources/materials目录下
mkdir resources/materials
ln -s [FDM_MATERIALS PATH] resources/materials/fdm_materials
至此,就可以在Pycharm中run cura_app.py了。
Happy enjoy!
转载自原文链接, 如需删除请联系管理员。
原文链接:CuraEngine和Cura配置(Ubuntu18.04环境),转载请注明来源!
