IRIS 框架
1、介绍
用go语言开发web架构,速度最快的web框架。
Iris是一款Go语言中用来开发web应用的框架,该框架支持编写一并在任何地方以最小的机器功率运行,如Android、ios、Linux和Windows等。该框架只需要一个可执行的服务就可以在平台上运行了。
Iris框架以简单而强大的api而被开发者所熟悉。iris除了为开发者提供非常简单的访问方式外,还同样支持MVC。另外,用iris构建微服务也很容易。
在iris框架的官方网站上,被称为速度最快的Go后端开发框架。在Iris的网站文档上,列出了该框架具备的一些特点和框架特性,列举如下:
1)聚焦高性能
2)健壮的静态路由支持和通配符子域名支持
3)视图系统支持超过5以上模板
4)支持定制事件的高可扩展性Websocket API
5)带有GC, 内存 & redis 提供支持的会话
6)方便的中间件和插件
7)完整 REST API
8)能定制 HTTP 错误
9)源码改变后自动加载
2 安装
通过设置GOPROXY=https://goproxy.io来使用代理进行包的下载
go get -u github.com/kataras/iris
简单案例:
//创建app结构对象
app := iris.New()
//端口监听
app.Run(iris.Addr(":8000"),iris.WithoutServerError(iris.ErrServerClosed))
//也可以之直接使用参1
//app.Run(iris.Addr(":8000"))
//注意此处的冒号不能忘记
//否则会报:[ERROR]listen tcp: address 8000: missing port in address
3 请求
get 请求 获取url中参数值: context.URLParam(“XXX”)
post请求 从表单中获取参数值: context.PostValue(“XXX”)
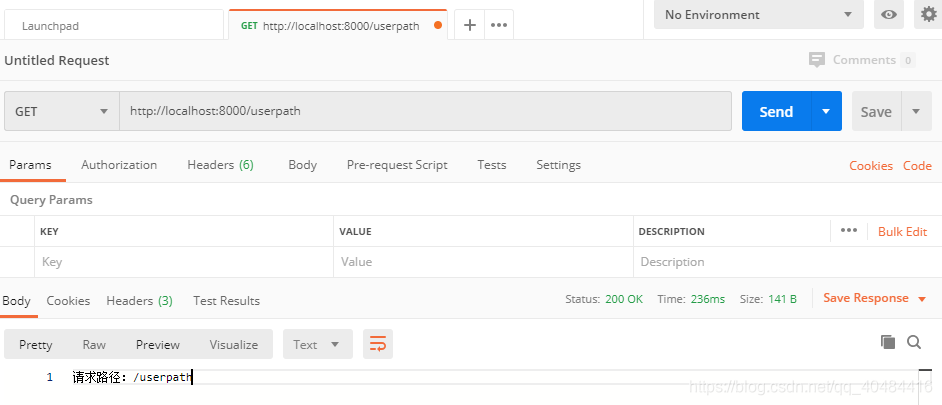
1) get 请求
   //处理Get请求
	app.Get("/userpath", func(context context.Context) {
		//获取Path
		path := context.Path()
		app.Logger().Info(path)
		//写入返回数据:string类型
		context.WriteString("请求路径:" + path)
	})

	//处理Get请求 并接受参数
	app.Get("/userinfo", func(context context.Context) {
		path := context.Path()
		app.Logger().Info(path)
		//获取get请求所携带的参数
		userName := context.URLParam("username")
		app.Logger().Info(userName)
		pwd := context.URLParam("pwd")

		//返回html数据格式
		context.HTML("<h1>" + userName + "," + pwd + "</h1>")
	})
(可以使用postman 测试api )

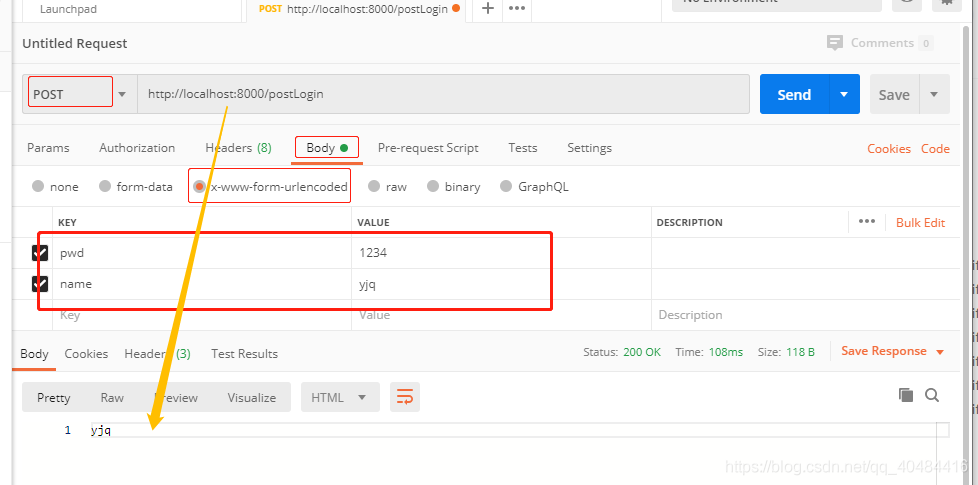
2)post 请求
	//处理Post请求 form表单的字段获取
	app.Post("/postLogin", func(context context.Context) {
		path := context.Path()
		app.Logger().Info(path)
		//context.PostValue方法来获取post请求所提交的for表单数据
		name := context.PostValue("name")
		pwd := context.PostValue("pwd")
		app.Logger().Info(name, "  ", pwd)
		context.HTML(name)
	})
用postman测试
处理post请求 JSON格式
	//处理Post请求 Json格式数据
	/**
	 * Postman工具选择[{"key":"Content-Type","value":"application/json","description":""}]
	 * 请求内容:{"name": "davie","age": 28}
	 */
	app.Post("/postJson", func(context context.Context) {

		//1.path
		path := context.Path()
		app.Logger().Info("请求URL:", path)

		//2.Json数据解析
		var person Person
		//context.ReadJSON()
		if err := context.ReadJSON(&person); err != nil {
			panic(err.Error())
		}

		//输出:Received: main.Person{Name:"davie", Age:28}
		context.Writef("Received: %#+v\n", person)
	})
    //自定义的struct
    type Person struct {
	    Name string `json:"name"`
	    Age  int    `json:"age"`
    }
处理post请求XML格式数据
	//处理Post请求 Xml格式数据
	/**
	 * 请求配置:Content-Type到application/xml(可选但最好设置)
	 * 请求内容:
	 *
	 *  <student>
	 *		<stu_name>davie</stu_name>
	 *		<stu_age>28</stu_age>
	 *	</student>
	 *
	 */

	app.Post("/postXml", func(context context.Context) {

		//1.Path
		path := context.Path()
		app.Logger().Info("请求URL:", path)

		//2.XML数据解析
		var student Student
		if err := context.ReadXML(&student); err != nil {
			panic(err.Error())
		}
		//输出:
		context.Writef("Received:%#+v\n", student)
	})
    //自定义的结构体
    type Student struct {
    	//XMLName xml.Name `xml:"student"`
    	StuName string `xml:"stu_name"`
    	StuAge  int    `xml:"stu_age"`
    }
请求数据返回格式
| 格式 | 语句 |
|---|---|
| 返回WriteString | context.WriteString(“Hello world”) |
| 返回html | context.HTML("< h1> Davie, 12 < /h1>") |
| 返回Json | context.JSON(iris.Map{“message”: “hello word”, “requestCode”: 200}) |
| 返回XML | context.XML(Person{Name: “Davie”, Age: 18}) |
| 返回Text | context.Text(" text hello world ") |
//json结构体
type Student struct {
	Name string `json:"name"`
	Age  int    `json:"age"`
}

//xml结构体
type Person struct {
	Name string `xml:"name"`
	Age  int    `xml:"age"`
}
handle 方式处理请求
	//GET: http://localhost:8002/userinfo
	//其余同理
	app.Handle("GET", "/userinfo", func(context context.Context) {
		path := context.Path()
		app.Logger().Info(path)
		app.Logger().Error(" request path :", path)
	})
4 路由
1) 正则表达式路由
正则表达式的具体规则为:
1、使用{}对增则表达式进行包裹,url中出现类似{}样式的格式,即识别为正则表达式
2、支持自定义增则表达式的变量的命名,变量名用字母表示。比如:{name}
3、支持对自定义正则表达式变量的数据类型限制,变量名和对应的数据类型之间用“:”分隔开。比如:{name:string}表示增则表达式为name,类型限定为string类型
4、通过context.Params()的Get()和GetXxx()系列方法来获取对应的请求url中的增则表达式的变量
5、增则表达式支持变量的数据类型包括:string、int、uint、bool等
使用:context.Params().Get(“name”) 获取正则表达式变量
//      http://localhost:8002?date=20190310&city=beijing
	//GET: http://localhost:8002/weather/2020-04-10/beijing
	//      http://localhost:8002/weather/2020-04-11/beijing
	//      http://localhost:8002/weather/2020-04-13/tianjin

	app.Get("/weather/{date}/{city}", func(context context.Context) {
		path := context.Path()
		date := context.Params().Get("date")
		city := context.Params().Get("city")
		context.WriteString(path + "  , " + date + " , " + city)
	})

	/**
	 * Get 正则表达式 路由
	 * 使用:context.Params().Get("name") 获取正则表达式变量
	 */
	// 请求1:/hello/1  /hello/2  /hello/3 ... /hello/10000
	//正则表达式:{name}
	app.Get("/hello/{name}", func(context context.Context) {
		//获取变量
		path := context.Path()
		//获取正则表达式变量内容值
		name := context.Params().Get("name")
		context.HTML("<h1>" + name + "</h1>")
	})
自定义正则表达式变量路由请求{uint64:uint64}
app.Get("/api/users/{userid:uint64}", func(context context.Context) {
		userID, err := context.Params().GetUint("userid")

		if err != nil {
			//设置请求状态码,状态码可以自定义
			context.JSON(map[string]interface{}{
				"requestcode": 201,
				"message":     "bad request",
			})
			return
		}

		context.JSON(map[string]interface{}{
			"requestcode": 200,
			"user_id":     userID,
		})
	})
路由组
	userParty := app.Party("/users", func(context context.Context) {
		// 处理下一级请求
		context.Next()
	})
	/**
	 * 路由组下面的下一级请求
	 * ../users/register
	 */
	userParty.Get("/register", func(context context.Context) {
		app.Logger().Info("用户注册功能")
		context.HTML("<h1>用户注册功能</h1>")
	})

	//处理请求 ../users/login
	//处理请求 ../users/info
	...
5 配置
1) 通过iris.Configuration{} 结构体进行配置
2) 通过读取tml配置文件进行配置
3) 通过读取yml配置文件进行配置
4) 通过json文件进行配置[读文件,解析]
app.Configure(iris.WithConfiguration( … ))
6 注册试图组件
app.RegisterView(iris.HTML("./views", “.html”))
【内容参考,B站的千峰教育的 go web iris实战框架的视频的。只有5节(后面的要付费,但是没找着,只找到了他的博客,https://me.csdn.net/qfzhangxu ),快的话2个小时就可以看完了】
感觉不管是之前的java的play框架、spring,还是现在的go的iris,这些web框架弄明白请求处理、路由、mvc运用,弄懂怎么使用这个框架应该是可以很快入门的。然后的话,就又是一条路走到黑。
转载自原文链接, 如需删除请联系管理员。
原文链接:IRIS 框架学习一,转载请注明来源!