前言
Windows 推送服务(WNS)也是 Win10 通知机制中的一种,今天与大家一起学习一下有关WNS的相关知识。使用 Windows 推送服务的前提是你需要有一个微软开发者账号,这样才能得到一些合法的密钥信息用于与WNS服务器完成通讯操作。
附上一张关于消息推送原理图:

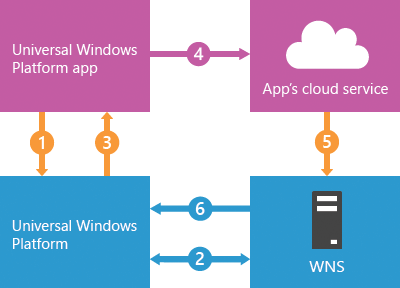
(来自 MSDN )
创建消息通道
使用 PushNotificationChannelManager 中的 CreatePushNotificationChannelForApplicationAsync() 创建 PushNotificationChannel 对象,通过订阅事件 PushNotificationReceived 接收 WNS 推送的消息。这里需要主意的是,PushNotificationChannel 内的 Url 属性。 WNS服务器怎么才能知道消息该推送给谁,就是依赖 Url 属性。
PushNotificationChannel pushNotificationChannel = await PushNotificationChannelManager.CreatePushNotificationChannelForApplicationAsync();
pushNotificationChannel.PushNotificationReceived += PushNotificationChannel_PushNotificationReceived;
private void PushNotificationChannel_PushNotificationReceived(PushNotificationChannel sender,
PushNotificationReceivedEventArgs args)
{
if (args.NotificationType == PushNotificationType.Toast)
{
ToastNotificationManager.CreateToastNotifier().Show(args.ToastNotification);
}
}
推送请求
这个过程分为两步进行:
- OAuth 认证
- 推送消息请求
了解OAuth认证的童鞋应该知道,我们应该具有一些合法的密钥信息,才能让目标服务器信任我们,然后我们才能进行真正的请求。而与WNS打交道时所有的密钥信息从哪来呢?这就需要微软开发者账号
登录微软开发者网站,打开你的仪表盘(DashBoard),如果你还没有应用就先创建一个应用。在应用详情里选择 服务 → 推送通知
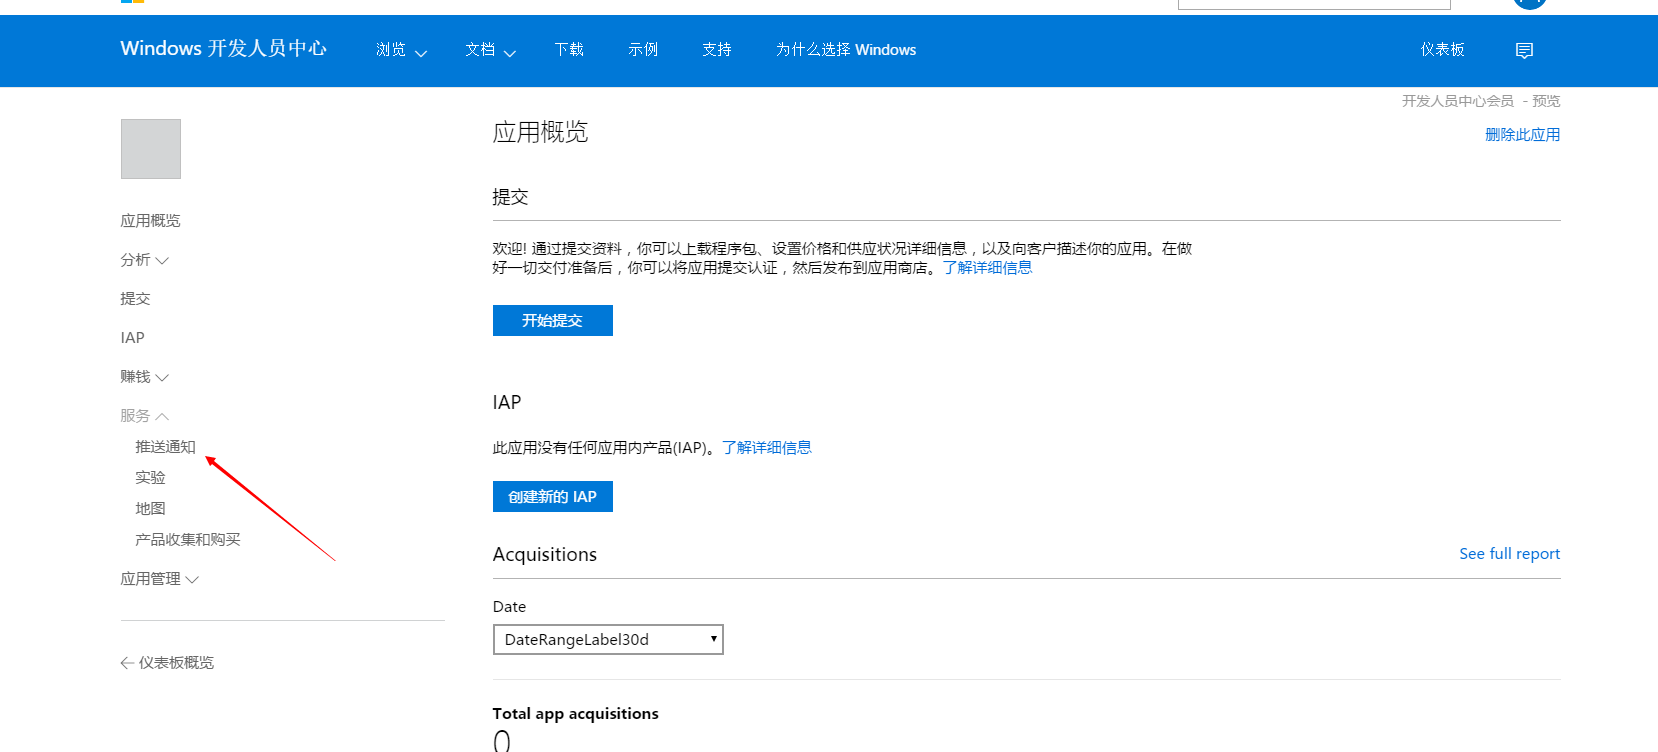
打开下图中链接

看到了么?这就是我们需要的信息
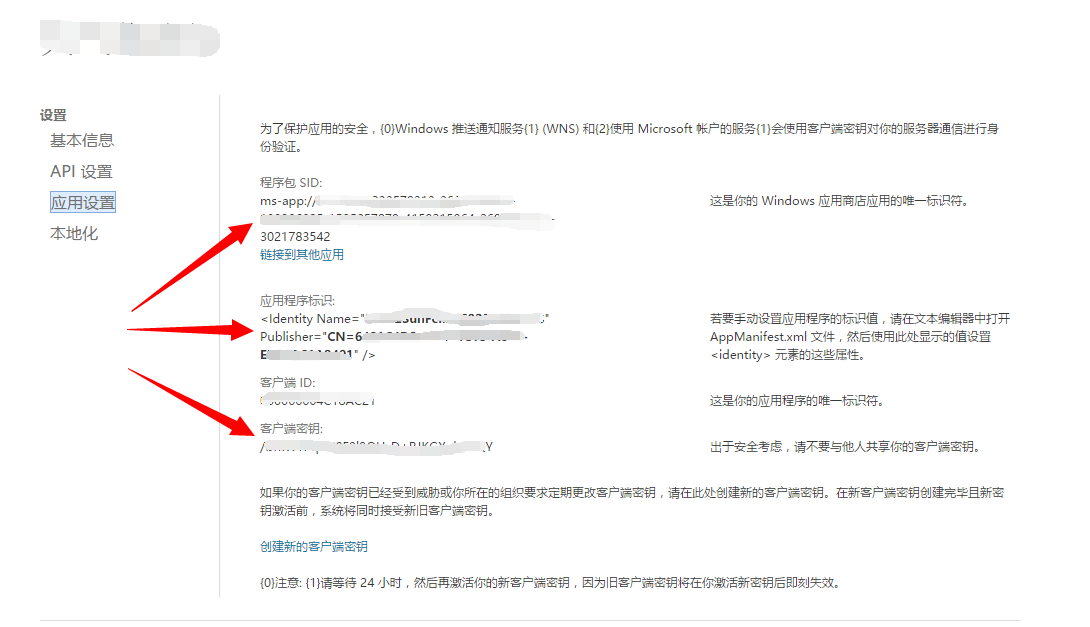
在进行 OAuth 认证我们需要 SID 与 Client_Id ,下面我们模拟一下 AppService 与 WNS OAuth认证过程
HttpClient httpClient = new HttpClient();
Dictionary<string, string> @params = new Dictionary<string, string>
{
    {"grant_type", "client_credentials"},
    {
        "client_id",
        "ms-app://************* SID ********************"
    },
    {"client_secret", "/********** Client Id *************"},
    {"scope", "notify.windows.com"}
};


HttpFormUrlEncodedContent httpFormUrlEncodedContent = new HttpFormUrlEncodedContent(@params);
httpFormUrlEncodedContent.Headers["Content-Type"] = "application/x-www-form-urlencoded";
var response =
    await httpClient.PostAsync(new Uri("https://login.live.com/accesstoken.srf"), httpFormUrlEncodedContent);


string content = await response.Content.ReadAsStringAsync();
认证成功后,可以得到 access_token ,这样我们的身份就合法了。
{
     "access_token":"*****************/****************=",
     "token_type":"bearer"
}
OAuth认证通过以后,就可以向WNS发送真正的推送请求了。下面我们模拟一下 AppService 是如何给 Client 推送 Toast消息。
HttpClient httpClient2 = new HttpClient();


HttpRequestMessage httpRequestMessage = new HttpRequestMessage(HttpMethod.Post, new Uri(ChannelUrl));
httpRequestMessage.Headers.Add("Authorization", "Bearer " + access_token);
httpRequestMessage.Headers.Add("X-WNS-Type", "wns/toast");


string toastContent = @"
    <toast>
        <visual>
            <binding template='ToastGeneric'>
                <text>Hello World!</text>
                <text>This is the first Example!</text>
            </binding>
        </visual>
    </toast>";


HttpStringContent httpStringContent = new HttpStringContent(toastContent);
httpStringContent.Headers["Content-Type"] = "text/xml";
httpStringContent.Headers["Content-Length"] =
    Encoding.UTF8.GetBytes(toastContent.ToCharArray()).Length.ToString();


httpRequestMessage.Content = httpStringContent;


var response2 = await httpClient.SendRequestAsync(httpRequestMessage);
该注意的是 ChannelUrl 就是客户端在创建 PushNotificationChannel 对象中的 Url 的值。请求成功后,WNS就会根据Url推送给与之对应的客户端。
结束
到此为止,我们已经实现一个远程推送的 DEMO。当然 WNS 里还有许多知识没有提及到,比如除了Toast通知外,我们可以推送Tile等其他类型的通知。推荐大家去仔细阅读一下官方的说明文档,后续我也会补充WNS额外的内容。
转载自原文链接, 如需删除请联系管理员。
原文链接:[Win10应用开发] 使用 Windows 推送服务,转载请注明来源!